编辑区域和预览区域
| Text Only |
|---|
| npm install monaco-editor
|
其他也有一些编辑器,具体参考:
项目使用 Monaco Editor(VS Code 同款编辑器)作为 Markdown 编辑器核心组件,支持智能补全、多光标编辑、代码折叠、语法高亮等特性。
一、MarkdownContainer
MarkdownContainer.vue 是 Markdown 编辑区域的容器,分为编辑器工具栏和编辑组件两部分:
MarkdownContainer.vue 参考
| TypeScript |
|---|
| <template>
<div id="md-edit-tools-bar" ref="toolsBarRef" class="md-edit-tools-bar">
<MdEditTools :tool-bar-width="props.mdContainerWidth" />
</div>
<div id="md-edit-component" class="md-edit-component">
<MdEditComp :editor-preview-width="props.mdContainerWidth" />
</div>
</template>
<script setup lang="ts">
import MdEditTools from './MarkdownEditToolsComponent.vue'
import MdEditComp from './MarkdownEditComponent.vue'
import { defineProps, ref } from 'vue'
const props = defineProps({
mdContainerWidth: {
type: String,
default: '100%'
}
})
</script>
|
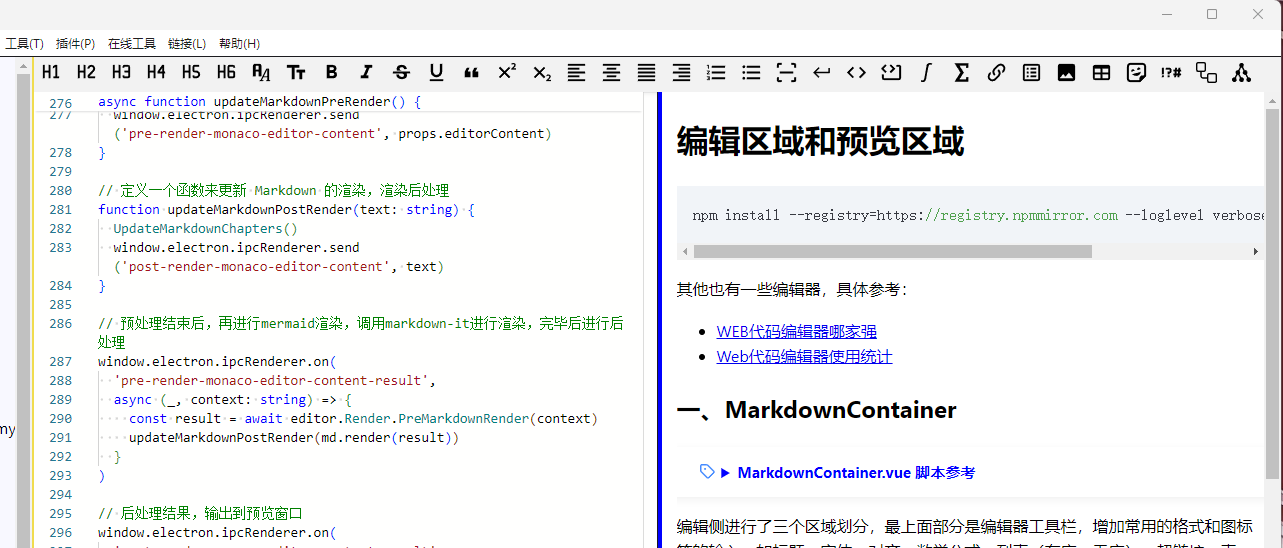
编辑侧进行了三个区域划分,最上面部分是编辑器工具栏,增加常用的格式和图标等的输入。如标题、字体、对齐、数学公式、列表(有序、无序)、超链接、表格、Emoji、特殊字符、mermaid绘图、Plantuml绘图。
下面的部分分为两部分,左侧作为编辑器区域,进行markdown的编辑,右侧增加预览区域。
中间有个分割部分,可以鼠标拖动,以修改编辑区和预览区的显示百分比。
另外,在视图部分,增加编辑框部分的显示模式。编辑器模式、预览模式、编辑/预览模式。
二、编辑器组件
这里使用的是 Monaco Editor 编辑器,嵌入 Vue 组件,组件监听编辑器内容变化,然后将新的内容实时渲染到预览区域。
2.1 MarkdownMonacoEditor.vue
Monaco Editor 通过 monaco-editor.create() 创建实例,挂载到 DOM 容器上:
MarkdownMonacoEditor.vue 核心实现
| TypeScript |
|---|
| <template>
<div id="monaco-editor-container" ref="monacoEditorContainer"
class="monaco-editor-container"></div>
</template>
<script setup lang="ts">
import * as monaco from 'monaco-editor'
import { ref, onMounted, watch, onBeforeUnmount } from 'vue'
import * as editor from './hemy-editor'
const props = defineProps({
code: { type: String, default: 'test' },
editorAreaWidth: { type: String, default: '50%' },
filePath: { type: String, default: '' }
})
const monacoEditorContainer = ref<HTMLElement | null>(null)
let editorInstance: monaco.editor.IStandaloneCodeEditor | null = null
// IPC 监听器:插入文本、更新选项、撤销/重做
window.electron.ipcRenderer.on('monaco-editor-insert-after-cursor', (_, context) => {
if (context && editorInstance) {
editor.InsertAfterCursor(editorInstance, context)
}
})
// 监听代码内容变化(带值变化守卫,避免更新循环)
watch(() => props.code, (newCode) => {
if (editorInstance) {
if (newCode.length === 0) newCode = '# '
// 更新编辑器内容
}
})
onMounted(() => {
if (monacoEditorContainer.value) {
editorInstance = monaco.editor.create(monacoEditorContainer.value, {
value: props.code,
language: 'markdown',
theme: 'vs',
automaticLayout: true,
// ... 其他配置
})
}
})
</script>
|
2.2 MarkdownEditComponent.vue
编辑区域和预览区域,支持三种显示模式和拖拽调整大小:
MarkdownEditComponent.vue 参考
| TypeScript |
|---|
| <template>
<div v-show="isShowEditArea" id="md-edit-component" class="md-edit-component"
:style="{ width: monacoEditorWidth }">
<MdMonacoEdit v-model="markdownEditorCode" :code="initialCodeContent"
:editor-area-width="monacoEditorWidthPx"
@update:code="handleMarkdownCodeUpdate" />
</div>
<div v-show="isShowResizer" id="resizer-md" class="resizer-md"
:style="{ left: resizerLeft }"
@mousedown="onEditorResizerMouseDown($event)"></div>
<div v-show="isShowPreviewArea" id="md-preview" class="md-preview"
:style="{ width: editPreviewAreaWidth, left: editPreviewAreaLeft }">
<MdPreview :editor-content="markdownEditorContent" />
</div>
</template>
|
拖拽调整大小:通过鼠标事件实现编辑区和预览区的宽度调整,限制最小 20%、最大 70%:
| TypeScript |
|---|
| function onEditorResizerMouseDown(e: MouseEvent) {
editorMouseStart = e.clientX
window.addEventListener('mousemove', onEditorMouseMove)
window.addEventListener('mouseup', onEditorMouseUp)
}
function onEditorMouseMove(e: MouseEvent) {
const windowWidthValue = parseInt(windowWidth.value.replace('px', ''), 10)
const moveX = e.clientX - editorMouseStart
const currentWidthPx = (parseFloat(monacoEditorWidth.value.replace('%', '')) / 100) * windowWidthValue
const newWidthPx = currentWidthPx + moveX
let newWidthPercent = pxToPercent(newWidthPx, windowWidthValue)
// 限制最小和最大宽度
const minWidthPercent = '20%'
const maxWidthPercent = '70%'
if (newWidthPercent > maxWidthPercent) newWidthPercent = maxWidthPercent
else if (newWidthPercent < minWidthPercent) newWidthPercent = minWidthPercent
monacoEditorWidth.value = newWidthPercent
editorMouseStart = e.clientX
}
|
三种显示模式:通过 IPC 监听切换编辑模式、预览模式、编辑/预览模式:
| TypeScript |
|---|
| function onHandleEditorShow(edit: boolean, preview: boolean) {
isShowEditArea.value = edit
isShowPreviewArea.value = preview
if (edit && preview) {
isShowResizer.value = true
monacoEditorWidth.value = '50%'
} else {
isShowResizer.value = false
monacoEditorWidth.value = edit ? '100%' : '0%'
}
}
window.electron.ipcRenderer.on('markdown-edit-model', () => onHandleEditorShow(true, false))
window.electron.ipcRenderer.on('markdown-preview-model', () => onHandleEditorShow(false, true))
window.electron.ipcRenderer.on('markdown-edit-preview-model', () => onHandleEditorShow(true, true))
|
三、预览区域
MarkdownPreviewComponent.vue 使用 markdown-it 及其插件链进行渲染,支持代码高亮、PlantUML、Emoji 等:
MarkdownPreviewComponent.vue 参考
| TypeScript |
|---|
| <template>
<div id="markdown-preview-html" class="markdown-preview-html md-typeset"
v-html="renderedMarkdownContent"></div>
</template>
<script setup lang="ts">
import { onBeforeUnmount, onMounted, ref, watch } from 'vue'
import highlightjs from 'markdown-it-highlightjs'
import { full as emoji } from 'markdown-it-emoji'
import hljs from 'highlight.js'
import MarkdownIt from 'markdown-it'
import plantuml from 'markdown-it-plantuml'
import * as editor from './hemy-editor'
import EventBus from '../../common/event_bus/event-bus'
const props = defineProps({
editorContent: { type: String, default: '' }
})
const renderedMarkdownContent = ref('')
let renderDebounceTimer: ReturnType<typeof setTimeout> | null = null
const RENDER_DEBOUNCE_DELAY = 150 // 防抖延迟 150ms
// markdown-it 渲染管线
const md = MarkdownIt({
html: true, // 启用 HTML 标签
xhtmlOut: true, // 使用 '/' 闭合单标签
linkify: true, // 自动转换 URL 为链接
langPrefix: 'language-',
breaks: true, // '\n' 转换为 <br>
typographer: false
})
.use(highlightjs, { // 代码高亮
inline: true,
hljs: hljs,
highlight: function (str, lang) {
if (lang && hljs.getLanguage(lang)) {
try { return hljs.highlight(str, { language: lang }).value }
catch (__) { console.warn(`Highlight error: ${lang}`, __) }
}
return ''
}
})
.use(plantuml) // PlantUML 支持
.use(emoji) // Emoji 表情
// 监听内容变化,带防抖优化
watch(() => props.editorContent, () => {
if (renderDebounceTimer) clearTimeout(renderDebounceTimer)
renderDebounceTimer = setTimeout(() => {
updateMarkdownPreRender()
renderDebounceTimer = null
}, RENDER_DEBOUNCE_DELAY)
}, { immediate: true })
// 预渲染:处理 mermaid、公式、路径等特殊格式
async function updateMarkdownPreRender() {
window.electron.ipcRenderer.send('pre-render-monaco-editor-content', props.editorContent)
}
// 后渲染:处理渲染后的 HTML
function updateMarkdownPostRender(text: string) {
UpdateMarkdownChapters()
window.electron.ipcRenderer.send('post-render-monaco-editor-content', text)
}
// 预渲染结果 -> markdown-it 渲染 -> 后渲染
window.electron.ipcRenderer.on('pre-render-monaco-editor-content-result',
async (_, context) => {
const result = await editor.Render.PreMarkdownRender(context)
updateMarkdownPostRender(md.render(result))
})
// 后渲染结果 -> 输出到预览窗口
window.electron.ipcRenderer.on('post-render-monaco-editor-content-result',
async (_, context) => {
renderedMarkdownContent.value = editor.Render.PostMarkdownRender(context)
})
</script>
|
3.1 渲染管线
渲染过程分为三个阶段:
| Text Only |
|---|
| 编辑器内容变化
│
▼
1. 预渲染(PreMarkdownRender)
├── Mermaid 图表渲染(```mermaid 块)
├── KaTeX 数学公式渲染($...$ 和 $$...$$)
├── Material Admonition 处理
├── 选项卡(Tabbed Set)处理
└── 路径、链接、特殊字体处理
│
▼
2. markdown-it 渲染
├── HTML 标签支持
├── 代码高亮(highlight.js)
├── PlantUML 渲染
├── Emoji 表情
└── 自动链接转换
│
▼
3. 后渲染(PostMarkdownRender)
├── HTML 后处理
└── 特殊格式调整
│
▼
v-html 绑定到预览区域
|
因为 markdown 语法本身是支持 html 语言的,所以遇到一些特殊的或者自定义的格式,这里就在渲染之前,进行预渲染。比如 mermaid 绘图、公式、路径、链接、自定义的格式、特殊的字体等。
预渲染之后,再使用 markdown-it 进行渲染,渲染结束后,再进行后渲染,这里对渲染之后的 html 再进行特殊的处理。
3.2 防抖优化
预览渲染使用 150ms 的防抖延迟,避免编辑器快速输入时频繁触发渲染,提升性能:
| TypeScript |
|---|
| watch(() => props.editorContent, () => {
if (renderDebounceTimer) clearTimeout(renderDebounceTimer)
renderDebounceTimer = setTimeout(() => {
updateMarkdownPreRender()
renderDebounceTimer = null
}, 150)
}, { immediate: true })
|
四、效果